


| Apps | About us | Contact |
|
|

|
|
![]() Take a picture, tag it, and send it to your friends and colleagues!
Take a picture, tag it, and send it to your friends and colleagues!
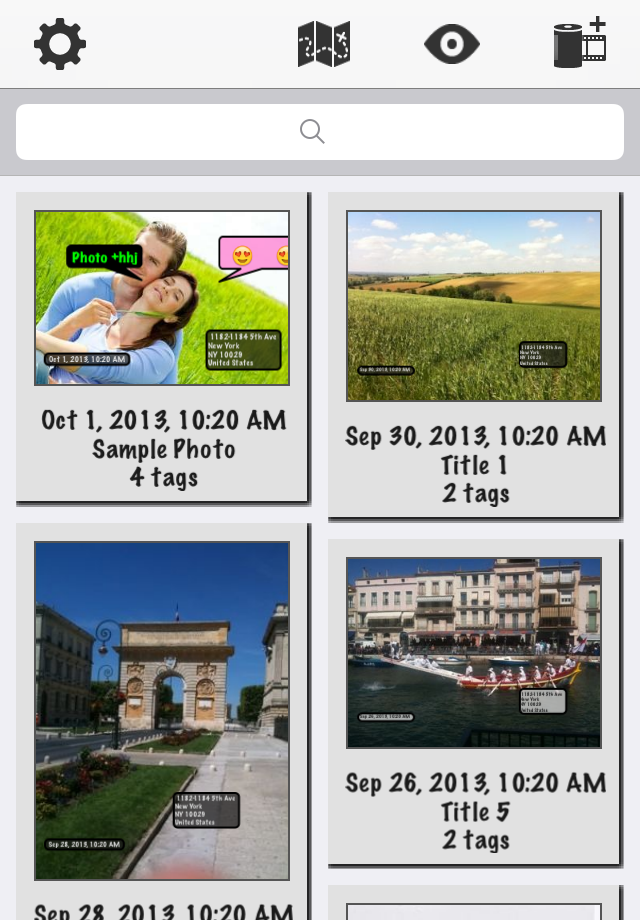
With Photo +, improving your pictures by adding personal or professional texts (tags) has never been so easy and fun. Share your photos with your friends or acquaintances by e-mail or on Twitter, Facebook or Instagram. Take a picture or select one from your personal library. Photo + automatically geolocates your photos and adds an Address and a Date tag to them. |
- send your photo by e-mail (jpeg or PDF format) - print your photo or open it in iBooks or other apps (PDF format) - save your photo in your film roll - post your photo on your Twitter, Facebook or Instagram account(s) |
* Freemium version, limited to 10 photos. Integrated purchase unlocks unlimited features. * |
Universal application for iPhone/iPad, iOS 5.0 and above.
Optimized for Retina Display.
Help & FAQ
1) General points:
![]() Is the application free of charge?
Is the application free of charge?
Downloading the application from the App Store is free, but you will only be able to create 10 photos. This will allow you to try the application and see for yourself if it fits your needs.
When creating the 11th photo, you will be given the opportunity to purchase an In-App Purchase in order to remove this limit. If you decide to make this purchase, you will then be able to create as photos as you wish.
![]() How can I become familiar with the application?
How can I become familiar with the application?
Installing the application will also create an example photo with a few tags. You will then be able to browse all the views of the app, and modify what you want. You will quickly learn how to use the application and its possibilities.
Once you no longer need this sample photo, you can, of course, delete it from the application.
![]() How can I restore an application I purchased?
How can I restore an application I purchased?
If you uninstall then reinstall the app, or if you install it on another device, the application won’t recognize your first in-app purchase.
To unlock it again, go to the app Settings view and perform one of the following actions:
- tap on the “Buy Full Version” / “Buy Now” buttons
- if displayed, hit the “Restore in-app purchase” button
Important note: make sure that your device is connected to the iTunes account you used for the first in-app purchase.
Your in-app purchase will be restored, and you won't be charged again.
You can restore your in-app purchase on up to 5 different iOS devices, using the same iTunes account. For more information about in-app purchases, visit:
http://support.apple.com/kb/ht4009
![]() Possible errors when making in-app purchases:
Possible errors when making in-app purchases:
Error messages: “In-app purchases are currently disabled.” or “There was an error purchasing this item, please try again.”
Check the following items:
-
in-app purchases are enabled (iOS Settings, General, Restrictions, In-app purchase)
-
your Internet connection is OK
-
you are properly connected to your iTunes account (iOS Settings, Store, Apple ID), and your credit card details are valid.
Error message: “This item is currently being modified”
Check the following items:
you are properly connected to your iTunes account (iOS Settings, Store, Apple ID), and your credit card details are valid.
if there seems to be nothing wrong with your iTunes account, contact the Apple Express Lane at:
http://www.apple.com/support/contact/
2) Manage your photos:
![]() How can I create a new photo?
How can I create a new photo?
Depuis la liste des photos :
From the photo list:
Hit the ![]() button to take a new photo.
button to take a new photo.
Or hit the ![]() button to select one from your library.
button to select one from your library.
![]() How can I edit or delete a photo?
How can I edit or delete a photo?
From the photo list, tap on the photo you want to edit or delete. The photo is then displayed, and you can create or modify its tags.
To delete it, simply hit the ![]() button.
button.
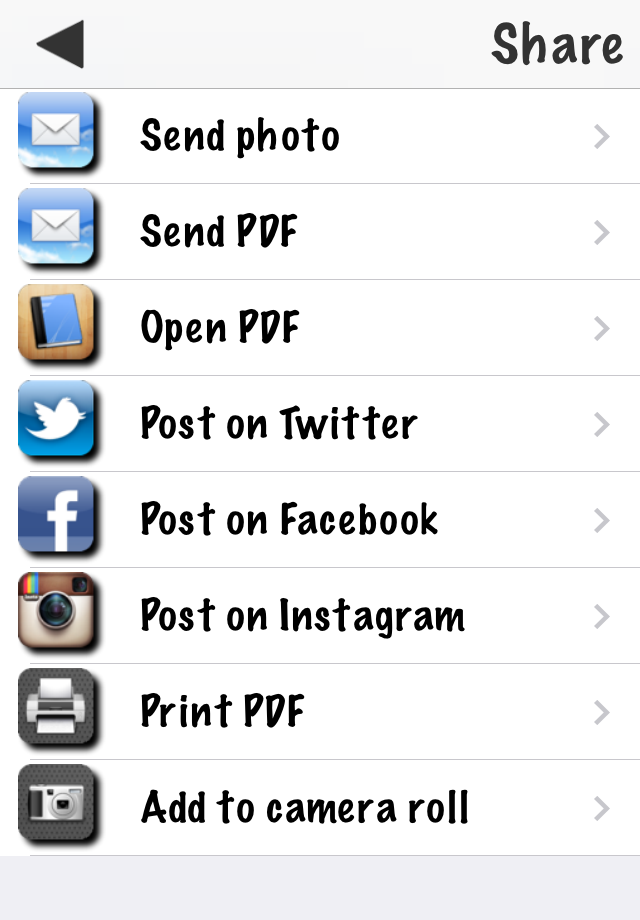
![]() How can I share a photo?
How can I share a photo?
From the photo list, tap on the photo you want to share. Once displayed, hit the ![]() button and choose the way you want to send or share it.
button and choose the way you want to send or share it.
Important Note: you need to have matching accounts to post your photos on Twitter, Facebook or Instagram.
![]() How can I add a title to a picture?
How can I add a title to a picture?
Tap on the desired photo in the photo list. Once displayed, hit the ![]() button and type the title.
button and type the title.
A tag will automatically be created with this title.
If you change the photo title, the Title tag will automatically be modified (or recreated if you deleted it previously).
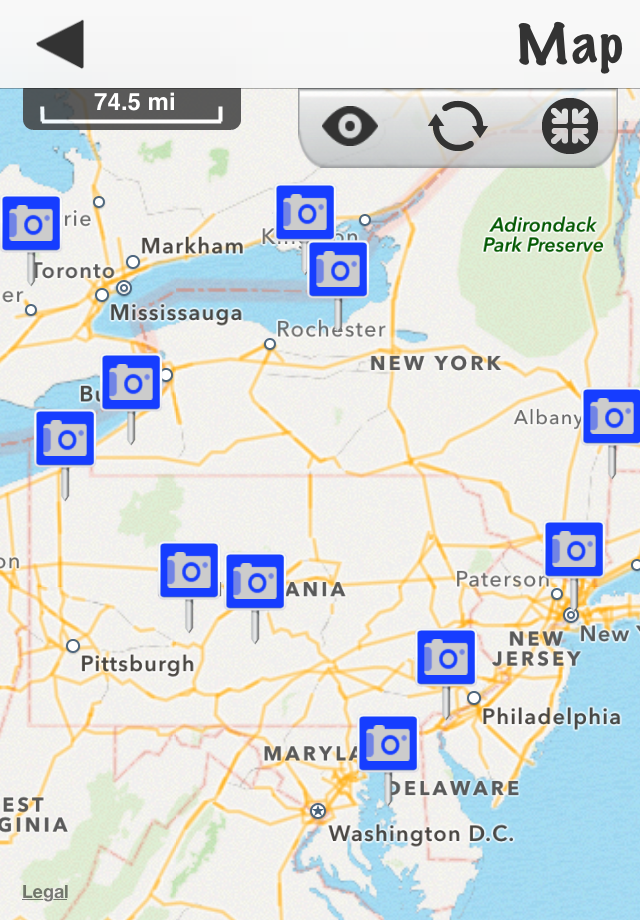
![]() How is managed the address of the photo?
How is managed the address of the photo?
If your photo was taken with an iOS device, it is geocoded: the coordinates (latitude and longitude) of the current location are automatically associated to it, with a greater-or-lesser degree of accuracy according to the GPS chip your iOS device features and the GPS signal reception conditions.
When you create a new photo, the application uses the original photo coordinates to determine the corresponding address (by using Google Maps services) and adds an Address tag if the coordinates are valid.
If no matching address is found, you can edit it by hitting the ![]() button.
button.
The application will automatically recalculate the photo coordinates according to the current location.
If your photo isn’t geocoded (i.e. if it contains no coordinates), the application doesn’t populate the address and no Address tag is generated (you can create one manually if you need to).
3) Manage your tags:
![]() How can I create a new tag?
How can I create a new tag?
From the photo view, hit the ![]() button.
button.
You can then type the content of your tag. You also have the opportunity to modify the font, size and color used, as well as the background color and transparency.
![]() How can I edit or delete a tag?
How can I edit or delete a tag?
From the photo view, tap on the tag you want to modify. The related information is displayed, allowing you to alter each field.
To delete it, simply hit the ![]() button.
button.
![]() How can I move a tag on a picture?
How can I move a tag on a picture?
From the photo view, press the tag and leave your finger on it, then move it on the photo as you wish.
![]() How can I use the Emoji (emoticons) characters in a tag?
How can I use the Emoji (emoticons) characters in a tag?
If you haven’t already, activate the Emoji keyboard on your iOS device:
-
launch the Settings app, select General, then Keyboards
-
select “International keyboards”, then “Add a keyboard”
-
select “Emoji icons” in the list
You can then activate the Emoji mode on a tag:
-
Create or edit a tag
-
Select the “AppleColorEmoji” font in the font list
-
Select the Emoji keybord by successively pressing the
 key on the keyboard.
4) Settings:
![]() How can I manage the application settings?
How can I manage the application settings?
From the photo list, hit the ![]() button.
button.
Then, select the settings button.
5) Saving and transferring data to another device:
![]() How can I save the application data?
How can I save the application data?
Application data backup is a built-in feature of your iPhone-iPad and iTunes, as long as you regularly synchronize your device with iTunes on your PC or Mac.
At the beginning of the syncing process, iTunes saves the following data from your device:
Contacts and Contact favorites
App Store Application data
Application settings, preferences and data
Music, videos, photos, etc.
When you change your device, or even with your current device, you are able to restore that backup with iTunes. You will thus be able to retrieve all the data and content saved during the last syncing.
For more information about backup saving and restoring, please visit:
http://support.apple.com/kb/HT1766?viewlocale=us_US
You can also use the “iTunes Database export” feature (see below) to run an individual backup of your application data. Be careful to properly save the “Database_Export.db” file on your PC or Mac.
![]() iTunes: How can I transfer my database to another device?
iTunes: How can I transfer my database to another device?
This process will allow you to export your application database to another device.
A) From your source device (device A):
select About, Settings, Database Management
select “iTunes File Sharing / Export Database”
connect your source device to your computer
in iTunes, select the device (below Devices), and click on the “Apps” button.
below “File Sharing” from the list on the left, select the application
from the list on the right, select the “Database_Export.db” file and click on “Save to”.
in the window that appears, select the destination where you want to save the file, and click Choose.
B) From your target device (device B):
connect your device to your computer
in iTunes, back up your device.
in iTunes, select your target device (below Devices), and click the “Apps” button.
Below File Sharing, in the list on the left, select the application
Click on ‘Add’ in the list on the right
in the window that appears, select the the “Database_Export.db” file you saved in step A.6 (see above).
the file is transferred to your device.
on your target device, select About, Settings, Database Management
select “iTunes File Sharing / Import Database”
Just confirm the import by clicking on “Yes” in order to replace the former database by the one just transferred.
Once finished, device B contains exactly the same data as device A.
Note 1: the Export feature can be used to back up your app database: in this case, select the ‘Database_Export.db’ file in iTunes, and click on ‘Save to’ to back it up on the chosen support (hard disk, USB storage, etc.).
Note 2: another way to back up your device is to Sync it with iTunes.
![]() iCloud: How can I transfer my application database to another device?
iCloud: How can I transfer my application database to another device?
Running iOS 5 or higher with a valid iCloud account, you can export your application database from your device to another device (iPhone, iPad or iPod touch) using the same iCloud account.
A) From your source device (device A):
select About, Settings, Database Management, Import Export
select “iCloud - Export Database”
B) From your target device (device B):
select About, Settings, Database Management, Import Export
select “iCloud - Import Database”. Check that the date and time correspond to the file you exported from device A.
just confirm the import by clicking on “Yes” in order to replace the former database of device B by the one just transferred from device A.
Once finished, device B contains exactly the same app data as device A.
Note 1: iCloud sync may take several minutes to complete, especially when data size is large and Internet connection, slow.
Note 2: if you have just installed and launched the app on device B, you are advised to wait a few minutes for the app to sync with iCloud, before exporting your data from device A.